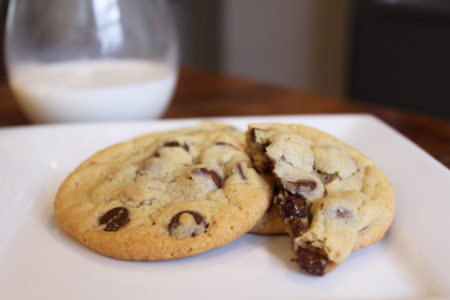
Moll Doll's Chocolate Chip Cookies
When I was 15 years old, I applied for a work permit and secured my first real job as a Sandwich Artist at our local Subway. I was eager to work and earn my own paycheck to spend on whatever I so desired...which in my teenage world was money for the mall and gas to beat around town in my 1990 baby blue Geo Prizm. My besties called me Moll Doll. Yep, I was cool. I learned a lot at that first job. Some good life lessons, the art of working with a variety of different personalities, and a total "ah ha" moment about Chocolate Chip Cookies. Curious what that might be? It is very simple. Do not overbake the cookies. Now...this may sound underwhelming, but trust me to keep reading. The cookies need to be taken out of the oven just when the edges start to brown. They will not look done in the center, but they are. If you bake them until the whole cookie is golden brown, they will be crispy, or what we would say at Subway..."burnt!" Yes, "burnt" cookies were golden brown cookies. They did not look burnt, but they were considered burnt because they were no longer the soft, chewy cookie that customers expected and loved. Now...a couple of my own secrets about chocolate chip cookies: 1) use good ingredients: unbleached all-purpose flour, organic cane sugar, organic eggs. 2) line your baking sheet with parchment paper: this ensures that the bottoms of your cookies do not burn....and if you bake multiple batches you won't have burnt residue on the bottom of your cookies. With all of that being said, here is my recipe for chocolate chip cookies. It is very similar to your standard cookie recipe with a little bit of Moll Doll and some Sandwich Artist wisdom weaved throughout. Enjoy!!!
Ingredients
- ¾ c. organic cane sugar
- ¾ c. brown sugar (packed)
- 2 sticks unsalted butter, softened
- 1 tsp. vanilla extract
- 2 large eggs (organic is best)
- 2¼ c. unbleached all-purpose flour
- 1 tsp. baking soda
- 1 tsp. salt
- 2 c. semi-sweet chocolate chips
Instructions
- Line baking sheets with parchment paper and preheat oven to 350°.
- Mix sugars, butter and vanilla on high until creamy. Add eggs one at a time, beating well after each one.
- Combine all of the dry ingredients except for the chocolate chips in a separate bowl, stirring to ensure baking soda is mixed through.
- At medium low speed, gradually add the dry ingredients to the sugar mixture. Once combined, add chocolate chips.
- Scoop onto baking sheets using a 4cm cookie scoop, leaving a 2 inch space between each one. Bake on center racks until the edges of the cookies are golden, centers will still be lighter in color (about 10-12 minutes). Quickly slide the parchment paper (with cookies on it) off of the baking sheet, onto the counter to cool.
- When cookies are cool enough to handle, try not to eat them all.
Notes
- It is important not to overbake the cookies. The perfect time to take them out of the oven is when the edges are golden and the center is puffy and lighter in color. Cooking time will vary for each oven.
- You may refrigerate the dough and bake within 24 hours. You will have to add a minute or two of cooking time for cold dough.